A vendor gave me a Raspberry Pi 3 a while back. I didn't really to much with it, but I had some time over the holidays so I decided I wanted to make it do something. I didn't want a huge project, more of just a "hello world" type activity.
While I'm intrigued by the small computer concept, I'm more interested in software than custom hardware. I run Ubuntu on an Intel NUC and it works great, so that satisfies most of my small computer needs.
First off, this is a great starter guide to the Pi. It's a free download and worth reading if you are considering doing something with a Pi. The first three chapters will get the Pi up and running.
Follow along with the first three chapters in the guide I mention above. This will get the Pi up and running to the point were you have the device booted and running with a GUI using the Raspbian operating system. You now have a nice, simple, low-power Linux based computer.
Note that to do this you will need an extra mouse, keyboard, HDMI cable, and monitor (or extra input on an existing monitor). I also used wired networking so I didn't have to mess with Wifi as another variable.
I had also found this Dot Net learning series, and saw that one of the topics was "Intro to IOT (Internet of Things) with .NET Core" so I decided to follow along with that. In addition to this blog, for the details you can follow this video series or take a look at chapters 5+ in the Pi starter book.
I also ordered one of these one of these and one of these one of these so I'd have some basic electronics components to work with. My only complaint with these Elegoo kits is that the resistors aren't well labeled (it's difficult to tell which side the bands start on, as there isn't enough spacing). Resistors and basic electronics are also covered in chapter 6 in the Raspberry Pi starter book.
Lastly, Rasbian comes with Python and a Python development tool (Thonny Python IDE) already installed, so you can use that for the coding activities, but I ultimately wanted to get .Net Core running on the Pi. I did the project with both Python and .Net Core 3.1, and both worked fine.
I assume you have Visual Studio Community Edition 2019 installed. You will also want to have Windows Terminal installed. We are going to use terminal to transfer the files to the Pi. You can install Windows Terminal from the Microsoft Store.
Open Visual Studio and create a new Console App (.NET Core). You can target .Net Core 3.1 or .Net 5.
Use Tools -> NuGet Package Manager to add the "System.Device.Gpio" library to your project. This allows you to programmatically control the pins on the Pi.
Add this code to your Program.cs
using System;using System.Device.Gpio;using System.Threading;namespace PiBlink{class Program{static void Main(string[] args){int pin = 18;GpioController controller = new GpioController();controller.OpenPin(pin, PinMode.Output);int lightTimeInMilliseconds = 1000;int dimTimeInMilliseconds = 200;// turn LED on and offwhile (true){Console.WriteLine($"Light for {lightTimeInMilliseconds}ms");controller.Write(pin, PinValue.High);Thread.Sleep(lightTimeInMilliseconds);Console.WriteLine($"Dim for {dimTimeInMilliseconds}ms");controller.Write(pin, PinValue.Low);Thread.Sleep(dimTimeInMilliseconds);}}}}
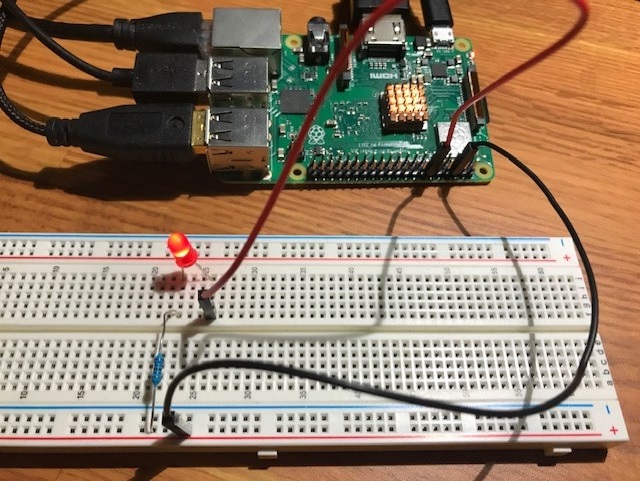
Wire up your Pi and breadboard into a simple circuit like this:

The 40 GPIO pins on the Pi are described on page 121 of the Pi book. I have the black wire connected to the third pin on the outer row (ground) and the red wire connected to pin #18 (which we can control with code).
Make sure to put a resistor in the circuit, or you will burn up the red LED. I'm using a 1000 ohm resistor, but 330 ohm should be sufficient.
Note: if you just want to test your circuit without code (you do!), plug the red wire into the "3V3" pin. This is a constant 3.3 volt output. See page 121 in the Pi book to find the 3V3 pin.
Let's publish our project. I published mine to c:\data\PiBlink.
Important! In the publish options:
What we have just done is we compiled our .Net project to run natively on Linux! .Net does not need to be installed on the Pi. Docker does not need to be installed on the Pi. Very cool right?!!
The most difficult part of this process is going to be getting the files from our Windows 10 desktop over the to Pi.
Your basic electronics kit from Elegoo has a more LEDs and a buzzer. Maybe see if you can get those to work. Chapter 7 in the Pi book describes an add-on board called the "Sense HAT" that contains other sensors for temperature and barometric pressure, as well as a number of other interesting options that might be fun to explore.